Wednesday, 29 August 2018

Kubernetes Dashboard setup

In my previous post i had explained about creating a three node master slave kubernetes cluster.
http://biexplored.blogspot.com/2018/08/kubernetes-cluster-configuration-and.html

This session will help to you deploy an kubernetes dashboard on the cluster and that will help us to monitor different applications hosted on the kubernetes cluster.

Step1: Using the link download and install kubernetes dashboard.


After installing the dashboard you can see a new service kubernetes-dashboard is started. it deployed required pods in the cluster.

The below command will get you the services running on the cluster
#kubectl get svc

For listing the pods
#kubectl get pods

After that describe the dashboard service and that will give you the details of the service.
#kubectl describe svc kubernetes-dashboard -n kube-system


As shown in the picture you can see the service is running in the nodeport 31000

try to access the dashboard through : http://<Master-IP>:3100 from the browser, and you can see the nice window for dashboard in the browser page.


Tuesday, 28 August 2018

Kubernetes cluster configuration and set up.

This post will explain about configuring a three node kubernetes cluster in CentOS machine.

Before you begin i will give you a basic idea about what we are going to achieve here.

Kubernetes is an open source container management system that will help us to deploy containers and scale them according to our requirement.If you need to create a 2 node cluster with some applications we can configure that with the help of kubernetes. Kubernetes master will take care of all the resource allocation and maintenance of the containers deployed in the cluster.

In this tutorial i am setting up a two node cluster using  three CentOS machines. Please not you need to have root access to complete the steps described and you need to run till step 8 in all the nodes.

Step 1: Identify the ip address and Host name of the machines that we are going to configure

10.1.X.X -- Machine host name 1 -- > Kubernetes Master
10.1.X.X -- Machine host name 2 -- > Kubernetes Slave Node 1
10.1.X.X -- Machine host name 3 -- > Kubernetes Slave Node 2

Step 2: Edit /etc/hosts file in all the three machines and add the three ip address

Eg: 
10.1.x.x Host_name_1
10.1.x.x Host_name_2
10.1.x.x Host_name_3


Step 3: Do a yum update
#sudo yum update

Step 4: Do some other configurations in the machine using the below commands

sudo setenforce 0
sudo sed -i --follow-symlinks 's/SELINUX=enforcing/SELINUX=disabled/g'      /etc/sysconfig/selinux
sudo modprobe br_netfilter
sudo echo '1' > /proc/sys/net/bridge/bridge-nf-call-iptables
sudo swapoff –a
sudo vim /etc/fstab

in fstab check are you able to see the UUID

then exit from the editor


Step 5: Install Docker

sudo yum install -y yum-utils device-mapper-persistent-data lvm2
sudo yum install -y docker-ce

Step 6:  Install Kubernetes

Add the kubernetes repository to the centos system by running the following command.
cat <<EOF > /etc/yum.repos.d/kubernetes.repo
[kubernetes]
name=Kubernetes
baseurl=https://packages.cloud.google.com/yum/repos/kubernetes-el7-x86_64
enabled=1
gpgcheck=1
repo_gpgcheck=1
gpgkey=https://packages.cloud.google.com/yum/doc/yum-key.gpg
EOF

Now install the kubernetes packages kubeadm, kubelet, and kubectl using the yum command below.
sudo yum install -y kubelet kubeadm kubectl

Step 7: Reboot the machine 
#sudo reboot

Step 8: Start Docker and Kubernetes
systemctl start docker && systemctl enable docker
systemctl start kubelet && systemctl enable kubelet
We need to make sure the docker-ce and kubernetes are using same 'cgroup'.
Check docker cgroup using the docker info command.
docker info | grep -i cgroup
And you see the docker is using 'cgroupfs' as a cgroup-driver.
Now run the command below to change the kuberetes cgroup-driver to 'cgroupfs'.

sed -i 's/cgroup-driver=systemd/cgroup-driver=cgroupfs/g' /etc/systemd/system/kubelet.service.d/10-kubeadm.conf
Reload the systemd system and restart the kubelet service.
systemctl daemon-reload
systemctl restart kubelet
Now we're ready to configure the Kubernetes Cluster.


Step 9: Kubernetes cluster initialization.

In this step, we will initialize the kubernetes master cluster configuration.
Move the shell to the master server 'k8s-master' and run the command below to set up the kubernetes master.
kubeadm init --apiserver-advertise-address=10.1.X.X --pod-network-cidr=10.244.0.0/16


Note:
--apiserver-advertise-address = determines which IP address Kubernetes should advertise its API server on(Master server).
--pod-network-cidr = specify the range of IP addresses for the pod network. We're using the 'flannel' virtual network. If you want to use another pod network such as weave-net or calico, change the range IP address.When the Kubernetes initialization is complete, you will get the result as below.


As shown in the command window you can use the kubeadm join command to join nodes to the cluster. Save this join token number for future use. If you need to add one more node to the existing cluster you can run this command on the salve node and join that node with the master.

Step 10: 

Now in order to use Kubernetes, we need to run some commands as on the result.
Create new '.kube' configuration directory and copy the configuration 'admin.conf'.

mkdir -p $HOME/.kube
sudo cp -i /etc/kubernetes/admin.conf $HOME/.kube/config
sudo chown $(id -u):$(id -g) $HOME/.kube/config
Next, deploy the flannel network to the kubernetes cluster using the kubectl command.
The flannel network has been deployed to the Kubernetes cluster.
Wait for a minute and then check kubernetes node and pods using commands below.

Step 11:

Run the below commands to see the status of the cluster with nodes and the running pods in the container.

kubectl get nodes
kubectl get pods --all-namespaces
And you will get the 'k8s-master' node is running as a 'master' cluster with status 'ready', and you will get all pods that are needed for the cluster, including the 'kube-flannel-ds' for network pod configuration.
Make sure all kube-system pods status is 'running'.
Kubernetes cluster master initialization and configuration has been completed.

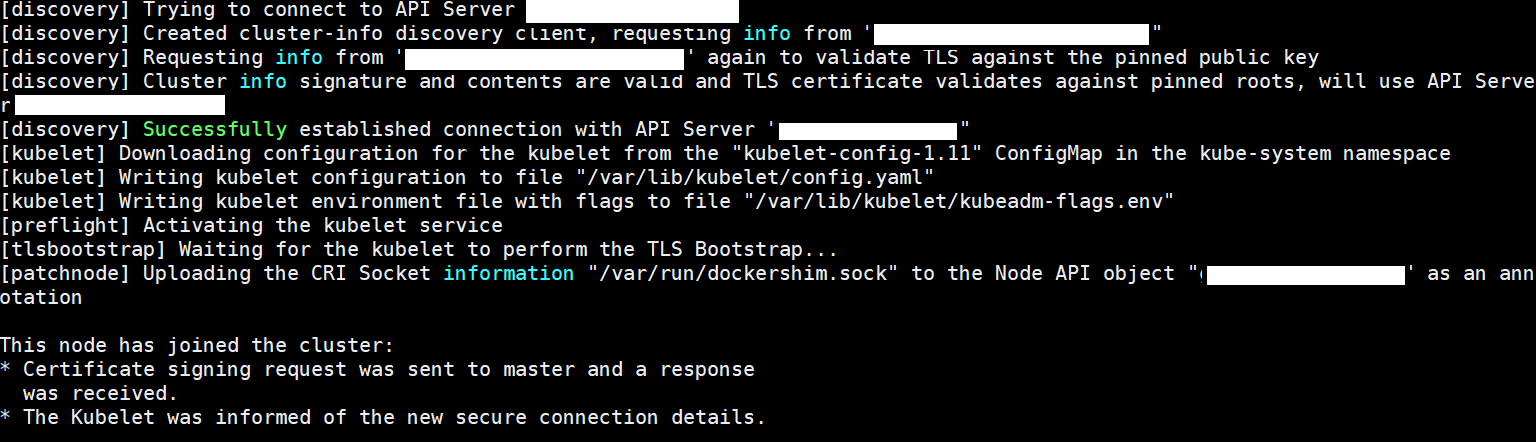
Step 12: Adding nodes to the existing cluster.

You can use the join command that you received when initializing the cluster to add nodes to the cluster. open shell script in each slave nodes and run the join command so as shown below you can see the node are joined to your cluster.


Wait for some minutes, and back to the master cluster server check the nodes using the following command.

sudo kubectl get nodes


Now you can see the cluster is ready with one master and two slaves. From the status bar we can see the status as Ready.


Friday, 23 February 2018

Connecting to hive tables from Qlik View.


Requirement: Need to establish a connection between Qlik view client and Hive tables in Linux environment.
Step 1: Check connectivity to Linux machine from the windows through the port 1000. You can use telnet to check the connectivity.
Eg: telnet  <Hostname> <Port>
If we are able to connect to the machine through 10000 then we are good to go.

Step2: Down load the Hive driver for windows from official Microsoft website.
You can download 32 bit or 64 bit based on your system specification.
·         HiveODBC32.msi
·         HiveODBC64.msi
Install the driver in your windows machine.
Step 3: Select ODBC Data Source 64 from windows search.


Select user DSN tab select add for adding a new data source. Then select Microsoft Hive ODBC Driver


Give the details and test the connectivity.


·         Gave Thrift Transport as SASL (Transport protocol used in Thrift layer).
Now save the Data source and exit. You can see in User DSN a new entry is added with Name Qlik.


Step 4:
Now we have created a DSN for connecting to Hive. We can use this for connecting Qlik with Hive tables.
Then open Qlik and select edit the script option. 


From this window select ODBCà Connect


Then select the DSN à Qlik and give username and password. Test the connection and now you have established a successful connection to Hive.


Then to select the tables from Qlik click on the tab select and you can see a window as shown below.


In this select query gave the query and save the file. You can use this QVW file for creating reports from HIVE tables.

Wednesday, 18 October 2017

ODI 12c Loading multiple files in a directory to Target table using looping concept.

Hi Guys,

I have a requirement to load all the csv files available in a folder to the target table. The file structure will be same but the name will be vary for each file. So i used variable and looping concept in ODI to achieve this requirement.

Steps followed.
1) list out the names of all the .csv files available in a directory to a temporary file.
----Command----

ls *.csv > Directory/Text_.txt

2) Separate the names into one by one.
---Command----

awk 'sub("$","\r")' Directory/Text_.txt > DirectoryALL_FILE_NAMES.txt

3)Write the file names into a Target table the structure of the target table can be.We can use an ODI interface to

CREATE TABLE ALL_FILE_NAMES
(
ROW_NUMBER INT,
FILE_NAME VARCHAR(50),
LOAD_STATUS VARCHAR(5),
LOAD_DATE DATE)
;

Row_Number: Sequence
File_Nmae: Can directly map the name from the file in ODI mapping.
Load_Status:Stamp 'N' as default.
Load_Date: Sysdate.

4) Create a variable for taking the file count. Select the count of files having LOAD_STATUS equals 'N'

5) Create an Evaluate variable
This variable can be used for looping through the package. In the evaluate condition we can give '>=1' so till the file count equals 0 the loop will be repeated.

6) Create a global variable for picking the file name dynamically.

Eg:
SELECT max(FILE_NAME) FROM ALL_FILE_NAMES
WHERE LOAD_STATUS='N'
group by FILE_NAME
ORDER BY 1


7) Create the interface for loading the data. The above created variable can be used as a file name for this interface.

Resource_Name:#GLOBAL.V_FILE_NAME

8) Create an ODI procedure for updating the file name.This will update the loaded file status to Y and this file will not be picked for next load.

UPDATE ALL_FILE_NAMES SET LOAD_STATUS='Y' WHERE FILE_NAME in (SELECT FILE_NAME FROM ALL_FILE_NAMES
WHERE LOAD_STATUS='N'
and FILE_NAME=#GLOBAL.V_FILE_NAME

9)Take the file count again. This time you will get the updated file count and if that is greater than 0 the loop will be repeated.

10) Refer the screen shot below so you will get a better understanding about the loop process.


Tuesday, 19 September 2017

ODI Configure Email Task.

Hi Guys,

In this post i will give you some tips that we can use while creating an Email task in ODI 12c.

The main thing that we need to take care while creating an Email task is Email Subject and Email Body. In failure email and all we need to make this dynamic so we will get proper failure email with subject.For that you can use the following codes.

Subject:
<%=odiRef.getContext("CTX_CODE")%> - ODI session <%=odiRef.getPrevStepLog("STEP_NAME")%> in package   <%=odiRef.getSession("SESS_NAME")%> FAILED AT <%=odiRef.getPrevStepLog("BEGIN")%>

By using the appropriate odiRef we can customize the subject accordingly.

Message Body:<%=odiRef.getPrevStepLog("MESSAGE")%>

This will give you the failure step description with error codes.


ODI error ORA-02292: integrity constraint (ODI_REPO.FK_MAP_PROP_1) violated - child record found

Error From ODI Error log.

java.lang.RuntimeException: java.lang.RuntimeException: java.lang.Exception: ODI-20088: Error while generating the scenario
.
Caused by: java.lang.RuntimeException: java.lang.Exception: ODI-20088: Error while generating the scenario
.
Caused by: java.lang.Exception: ODI-20088: Error while generating the scenario
.
Caused by: oracle.odi.core.repository.UncategorizedRepositoryAccessException: ODI-10182: Uncategorized exception during repository access.
ODI-10143: Error while accessing the ODI repository.
ORA-02292: integrity constraint (ODI_REPO.FK_MAP_PROP_1) violated - child record found
.
Caused by: oracle.odi.core.repository.RepositoryIntegrityViolationException: ODI-10143: Error while accessing the ODI repository.
ORA-02292: integrity constraint (ODI_REPO.FK_MAP_PROP_1) violated - child record found
.
Caused by: java.sql.SQLIntegrityConstraintViolationException: ORA-02292: integrity constraint (ODI_REPO.FK_MAP_PROP_1) violated - child record found


Cause:

Actually i tried to find out if there is any mistakes in the mapping but it is perfectly fine and no other issues.The issue is that we cannot generate the scenario for that.
The reason is some how the code for the mapping is corrupted.

Solution:

I found the solution from the Oracle blog, just updating that here.

The solution is to upgrade the ODI environment to the latest version of ODI 12.2.1.2.6.

There is a workaround involving an export/import of the mapping that can be used until the environment can be patched.

Export the problem mapping.
Open the mapping xml export file for edit.

Locate the lines containing field name IOwnerExecUnit with a number as a value.

For example:
<Field name="IOwnerExecUnit" type="com.sunopsis.sql.DbInt"><![CDATA[40275]]></Field>

You have the option to remove the line completely, or change the line to have a null value.
For example:
<Field name="IOwnerExecUnit" type="com.sunopsis.sql.DbInt"><![CDATA[null]]></Field>

Import this file back into ODI. You should be able to successfully compile it into a scenario.

After doing this step i am able to create the scenario and run it.

Hope this will help you also !.

Thursday, 4 May 2017

ODI 12c Using custom SQL to over ride default Source query.

In this post i will give you a brief idea about a new feature introduced in ODI 12c.

As in informatica now ODI also support SQL query over ride, we can use a custom sql query to over ride the source query.

This feature is available in 12c in Extract option under physical diagram

After creating the mapping navigate to the Physical tab and in Extract Option we can see a feature CUSTOM_TEMPLATE.

In this area we can write a custom select statement and that will be used as a source query for populating the target.

Please remember to map all the fields that in the over ride query from source.

IKM Used: IKM Oracle insert global.


Thank you.