Wednesday, 30 November 2016

Connecting to ORACLE database from SSIS

Issue: I have to connect to ORACLE database from my SSIS tool.

Solution: Download and install

32-bit Oracle Data Access Components (ODAC) with Oracle Developer Tools for Visual Studio 

Using the following link:http://www.oracle.com/technetwork/topics/dotnet/utilsoft-086879.html

Then install the driver and it ask for data base details before the final step.So provide the DB Name(Just a name),Host name,Port,Service name

After competing installation restart your machine.

Then open your SSIS and select OLEDB Source and create a new connection.

From the Provider select Oracle Provider for OLEDB.


Then it will ask for the server or file name, give the name of your DB that you provided during installing the client.(Entry in your tnsnames.ora) Then give username and password and test the connection.


You can see connection successful and you can connect to the database and select the tables. 

Friday, 18 November 2016

Issue while Converting String to Int data type in SSIS Source Excel.

Issue: When converting String data type to Int using data conversion in SSIS, The transformation failing with conversion error.Source used is Excel

Cause: Excel source file contain Nulls and empty values. So because of empty string we are not able convert the values.

Solution:Add a derived column transformation and add the following expression for the derived column.

Expression: ISNULL([COLUMN_NAME]) || TRIM([COLUMN_NAME]) == "" ? (DT_I4)0 : (DT_I4)[COLUMN_NAME]

Then use this derived column in the output.

So if there is empty string or null values that will be replaced with O else with the column name.

Thank you.

Monday, 24 October 2016

SSIS Error "DT_GUID" cannot be used with binary operator "!=" while doing incremental load.

Issue:

While doing incremental load in SSIS we have a condition to chehck whether source and target column values are same or not

So in Conditional Split transformation we did a comparison like
[Source_colum != Target_Column]

But when we used a column with data type uniqueidentifier we encountered an issue as shown below.


Cause: 

The column that we used for comparison have data type DT_GUID and that cannot be used for binary operation.

Solution:

Cast the datatype to character and we can use that for comparison.

SSIS format for casting to string  (DT_STR,50,1252)[Colum_Name]

(DT_STR,30,1252) casts 30 bytes, or 30 single characters, to the DT_STR data type using the 1252 code page.


So code used for comparison (DT_STR,30,1252)Source_column != (DT_STR,30,1252)Target_column


Tuesday, 20 September 2016

[Solved] ODI Error while sending mail using Jython code.Caused By: org.apache.bsf.BSFException: exception from Jython: SyntaxError: ("mismatched character '\\n' expecting '''",

We configured ODI send mail functionality using jython code as we have to configure authenticated mail functionality and also specify the port,

Jython code that we used for ODI Send mail.

import smtplib
import java.lang.String
import string
import java.lang as lang
BODY=string.join((
"To: %s" % 'User_Mailid',
"Subject: %s" % 'Mail Subject' ,
"",
'We used a variable for Mail Content'
), "\r\n")
sender = smtplib.SMTP('Mail Host',Port)
sender.set_debuglevel(1)
sender.ehlo()
sender.starttls()
sender.ehlo()
sender.login('Sender mail id','Password)
sender.sendmail('Sender mail id',['User_Mailid'],BODY)
sender.close()

When we executed the procedure for ODI- send mail functionality we got an error as shown in the screen shot.

Error:


Cause: Some mismatched character in the mail content.

Solution:Issue is with the variable that we used to get the count of source and target file count.

We used a refresh variable to get the count .

Issue is with the syntax that used.

we used chr(13)||chr(10) for new line in the variable and jython code is not supporting this type syntax so we replaced that with '\n'  then refreshed the variable and executed the package successfully.


Tuesday, 6 September 2016

Not able to give shared location for RPD. After configuring horizontal clustering in OBIEE [Caused by: oracle.sysman.emSDK.app.exception.EMSystemException ].

Error:

After Configuring horizontal clustering in OBIEE we are not able to give shared location for RPD in Enterprise Manager.

Solution :

Enabled global cache in Enterprise Manager and provided the shared path for global cache.

Cause:

In a clustered environment, Oracle BI Servers can be configured to access a shared cache that is referred to as the global cache.
This parameter specifies the physical location for storing cache entries shared across clustering.
This path must point to a network share. So that all clustering nodes share the same location.


Thursday, 18 August 2016

obiee11g bi_server1 state changed to admin mode when started.

Error: when started obiee bi_server1 state changed to Admin mode.


Error in log file: The Network Adapter could not establish the connection

Cause: bi_server not able to connect to the database.

Solution: Check the users that expired and locked in DB using the query.

Connect to your database from obiee installed machine using sqlplus

(sqlplus user/pass@hostname:1521/orcl)

select username, account_status from dba_users where ACCOUNT_STATUS LIKE '%EXPIRED%';

and check whether DEV_MDS or DEV_BIPLATFORM is there or not.

If these users are locked unlock the user.

In my case SYSMAN account is expired so unlock the user and restart OBIEE.

Connect to sqlplus using nolog : >sqlplus /nolog

after that unlock the user using below mentioned query.

SQL> conn / as sysdba
Connected.
SQL> alter user sysman identified by [new password]
2  /
User altered.
SQL> alter user sysman account unlock;

User altered.
SQL> exit

Tuesday, 16 August 2016

Data Warehouse and Concepts.

Why we need data warehouse ?


  • Consider the case of a multinational company. In that company the source of data can be in different format and different type for example
    • Customer data in Siebel (CRM Tool)
    • HR System data in people soft 
    • CSV files
    • Excel files
    • XML Sources
  • Querying data from different systems will be a difficult task.
So what data warehouse doing is consolidating all the data from different systems into a single location. And that location is called data Warehouse and all the data from different sources are loaded into the data warehouse through ETL tools like informatica,ODI. And put together in a single location that will make our job simple and we can use data from different sources from the data warehouse.

OLTP and Data Warehouse(OLAP).

OLTP: 
  • Contain large number of users and optimized for transnational processing
  • For example amazon multiple users are connected and they are doing simple transactions.
  • Real time validation is necessary because users are active in all time.
  • Normalized data model.
  • More and more joins so not preferred for fast data retrieval.

Data Ware House(OLAP): 
  • Contain limited number of business users and used for analytical purpose,
  • For example number for orders placed in last quarter. Large query include aggregations and calculations.
  • Load data using ETL. No real time validation needed.
  • De-normalized Model or Dimensional modelling: Star schema and Snow-flake schema.Star Schema: 
    • Star Schema: 
      • Fact and Dimensional table.
      • Denormalized data Eg: Product dimension contain most of the details of product and Store dimension contain most of the details of stores.
      • Dimensions are denormailzed.
      • Dimension Table: Describe the details of dimension.
      • Fact Table : Contain measures and foreign keys of dimension table.
      • We can answer more questions using this model.
    • Snowflake Schema:
      • Dimensions are normalized: In snowflake schema we are simplifying our dimension table by normalizing the data. For example if the Product dimension table contain details of product,category,brand etc. then we are dividing this into different table like one table for Category and another for Brand. By this method we can make our Dimension table into multiple Dimension table.
      • If we have large number of different Brands of product then it is better to keep this as a separate Brand table for better querying purpose.
      • We choose this method when we have large volume of data in our dimension table.

Tuesday, 9 August 2016

Informatica Components Overview.

We call look into a high level architecture of informatica.

Informatica Components 

Informatica Domain

Informatica domain is the primary unit that manages administrative and management process in informatica and contain nodes and services associated with each node.

Node: Nodes are the physical machines. We can have single node or multiple node multiple nodes are used for high availability in informatica.

Under each node we have services.


Server Components

Infromatica tool consist of mainly 2 services
  • Repository Service
  • Integration Service
Repository Service

Repository service is used for maintain informatica metadata  and for managing connections between informatica repository and client tools. Metadata means data about data that contain details about 

  • Source definition
  • Target definition
  • Transformation details
  • Session details containing details about when to execute transformations.
  • Connection details.
Integration Service

Integration service comes into picture when we run the transformation. 
  • Integration service is responsible for movement of data from source to target.It get the connection details from repository and move the data accordingly.
  • Responsible for scheduling of workflow and sessions.

Some other service is also there related to informatica
  • Web service hub: This is used when we are connecting to any web content.
  • Reporting Service: Informatica reporting tool
  • Metadata manager service: 
  • SAP BW Service: Used if we have source or Target as SAP.
  • Model Repository service: Part of data quality
  • Data integration service: Part of data quality
  • Content Management Service: Part of data quality
  • Analyst Service: Part of data quality

Client Components.

Informatica client components are
  • Repository Manager:
    • Used for administrative purpose .
    • For managing permissions for users and groups.
  • Designer:
    • Used to create and design mappings.
    • Used to import sort,target,mapplet and transformations.
  • Workflow Manager:
    • Used to crate sessions and workflows
    • A session can be called as a run time entity of a mapping. All the information of a mapping can be configured from here.
  • Workflow Monitor:
    • For monitoring status of a workflow. 

Wednesday, 3 August 2016

[SOLVED] [Error] Deployer :Failed to initialize the application 'oraclediagent' due to error weblogic.application.ModuleException: Failed to load webapp: 'oraclediagent'.

Error: After implementing high availability in OBIEE when started, biserver_2 state changed to Admin.

error:

"<Error> <Deployer> <BEA-149205> <Failed to initialize the application 'oraclediagent' due to error weblogic.application.ModuleException: Failed to load webapp: 'oraclediagent'."


Cause:
In our environment we have total 3 managed servers

  • bi_server1
  • bi_server2
  • odi_server1
and all the servers are deployed in bi_cluster. As we have bi_server2 is in different machine and only we are going for scale out of bi system, ODI related files will not be there in machine 2.

But when starting bi_server2 it tries to load odi related files also because odi and bi_server is hosted in bi_cluser.

Solution:
 
 Below mentioned applications are trying to deploy in bi_cluser.


/home/oracle/MWHome/Oracle_ODI1/setup/manual/oracledi-agent/oracle.odi-agent_11.1.1.jar 
/home/oracle/MWHome/Oracle_ODI1/setup/manual/oracledi-sdk/oracle.odi-sdk_11.1.1.jar 
/home/oracle/MWHome/Oracle_ODI1/setup/manual/oracledi-metadata-navigator/odiconsole.ear 
/home/oracle/MWHome/Oracle_ODI1/setup/manual/oracledi-agent/oraclediagent.ear 

So edit the config.xml file and manually edit the target for the above applications from bi_cluster to bi_server1,odi_server1,AdminServer so the applications will not try to deploy in bi_server2.

Eg of the config file.

"<library>
    <name>oracle.odi-sdk#11.1.1.5.0@11.1.1.5.0.1</name>
    <target>bi_server1,odi_server1,AdminServer</target>
    <module-type>jar</module-type>
    <source-path>/home/oracle/MWHome/Oracle_ODI1/setup/manual/oracledi-sdk/oracle.odi-sdk_11.1.1.jar</source-path>
    <security-dd-model>DDOnly</security-dd-model>
    <staging-mode>nostage</staging-mode>
  </library>"

Monday, 1 August 2016

VNC Screen Displaying Black screen with a cross mark:Error xsetroot,xterm,twm command not found.

VNC Application is used to remotely connect to a server from our local machine and work from our local instance, it works like Team Viewer. This application is really helpful in the situations like if our server is located in different network and while accessing our server from our client  it is really slow. Like this situation VNC application is really helpfull.

In our case  we have to access a server located in 10.#.#.# network from 192.#.#.# network so for that we installed VNC server in 10.#.#.# network and client in 192.#.#.# network.

Steps to install VNC viewer and client is provided in the below mentioned blog:

https://oracle-base.com/articles/linux/configuring-vnc-server-on-linux


After configuring VNC Server and Client when i connected to the server from my local windows i can only see a blank black screen and a cross mark.

So i checked the log files and the issue description is given below:

/root/.vnc/xstartup: line 27: xsetroot: command not found
/root/.vnc/xstartup: line 28: xterm: command not found
/root/.vnc/xstartup: line 29: twm: command not found

It shows some of the packages are missing.

So please download and install rpms related to xorg-x11-twm , xterm ,xsetroot.

yum install xorg-x11-twm
yum install xterm
yum install xsetroot

Then restart VNC Server.

After restarting server try connecting from client.


Friday, 22 July 2016

Node manager status is inactive after configuring SSL for OBIEE.

After configuring SSL for OBIEE we faced some issues in node manger.

Issue: Node manger is stated but when checked from weblogic it's status inactive.

Solution : Login to console and select your machine under configuration tab select Node Manager and change type to plain.


In your nodemanger.properties file check whether SecureListener=false.

After this restart node manger,admin and managed servers.

Then check the node manger status and you can see it node manager is in Reachable state.


Thank you.

Friday, 15 July 2016

Error at step 11 of 12 in Scale out BI system while implementing horizontal clustering.

Error: When implementing horizontal clustering in OBIEE. The process failed at the step of starting BI_Server. The Scale out BI System completed up to 73%.

Cause: Extending domain can't start the BI_Server.

Solution:

1: Do not close the installation window.

2: Check the managed server(bi_server1) log

3: In our case error shown is:

"<Critical> <WebLogicServer> <BEA-000386> <Server subsystem failed. Reason: java.lang.AssertionError: java.net.UnknownHostException: Host Name
java.lang.AssertionError: java.net.UnknownHostException: Host Name"


4: Edit /etc/hosts file in both machines the one we are extending the domain and the one we installed our weblogic server

And added the following entries in the file.

ip hostname hostname.domainname(of the working machine)
ip hostname hostname.domainname(of the machine taht we want to connect)

5: Then try starting the managed server using the command startManagedWebLogic.cmd bi_server1 http://<Admin Server IP Address/Host name>:7001 

6: This will start your managed server.Then from the configuration wizard where we stuck select the tick box on the top.

7: Then retry the extending domain proess.


Tuesday, 12 July 2016

[SOLVED] Node manager is down after configuring SSL in weblogic [Cannot convert identity certificate]

Error:  <SEVERE>  <Fatal error in node manager server>
java.lang.RuntimeException: Cannot convert identity certificate

Cause:Reason for this issue is we configured SSL.enableJSSE=true  in weblogic console only. We need to set this option in startNodeManager.sh file also

Solution: Edit your startNodeManager.sh file and add the below tag in the following location

Tag to add : "-Dweblogic.security.SSL.enableJSSE=true"


Monday, 4 July 2016

Solved[BEA-000386]: Server subsystem failed. Reason: weblogic.security.SecurityInitializationException: Authentication for user denied In OBIEE

Error: While starting BI_Server, server state changed to force shutting down with the following error.

" <Critical> <WebLogicServer> <OPQA007> <bi_server1> <main> <<WLS Kernel>> <> <> <1467614089016> <BEA-000386> <Server subsystem failed. Reason: weblogic.security.SecurityInitializationException: Authentication for user  denied "


Cause: boot.properties file is not properly set.

Solution: check whether boot.properties file is present in the below mentioned location

"/home/oracle/MWHome/user_projects/domains/bifoundation_domain/servers/AdminServer/security/"

If it is not there create a boot.properties file

Entries in the file

#Mon Jul 04 02:53:28 EDT 2016
password=
username=

Provide proper username and password then save the file in the

"/home/oracle/MWHome/user_projects/domains/bifoundation_domain/servers/AdminServer/security/"
 location.

Do the same for bi_server1

Then restart Admin and bi_server1

Then bi server can load the credentials from boot.properties file.


Friday, 1 July 2016

[Solved][Error INST-08058]: A lookup of the address for this machine returned an IP address rather than a hostname.]

Error: Got the following error while scaling the BI server in weblogic in step scale  Outt BI system.
         
error:INST-08058: A lookup of the address for this machine returned an IP address rather than a hostname.

Cause: The machine is not able to identify the host name while configuring BI Server.

Solution: Edit /etc/hosts file in both machines the one we are extending the domain and the one we installed our weblogic server

And added the following entries in the file.

ip hostname hostname.domainname(of the working machine)
ip hostname hostname.domainname(of the machine taht we want to connect)

Then proceed with the installation.


Thursday, 23 June 2016

Patching OBIEE 11g in 4 steps.

Step 1: Download the required patch from oracle.

Backup OBIEE Installation
Backup the current OBIEE installation. In particular, the "Read Me" highlights the following:

FMW_HOME\Oracle_BI1\bifoundation\server directory

 FMW_HOME\instances\instance1\bifoundation\ OracleBIServerComponent\coreapplication_obis1\repository

FMW_HOME\Oracle_BI1\bifoundation\jee\mapviewer.ear\ web.war\WEB_INF\conf\mapViewerConfig.xml


Step 2: extract the patch and you can see more compressed files.Extract each zip files and put the files in some folder inside Oracle_BI1,(Please gave folder name without spaces)


Step 3: Down BI Services(Admin and managed server) and Open cmd in admin mode and navigate to oracle_BI1

 then set the environment variables as shown in below screen shot

For Linux environment


For Windows environment


Step 4: Navigate to the folder where you copied the patches and from inside the patch folder run opatch apply command


separately navigate to each patch folder and run opatch apply command.

You can see Opatch succeeded after each patch.


After applying all patch verify patches using the command

opatch lsinventory|grep applied


Now start BI services and verify the version of OBIEE from administrator.


Thank you.


Tuesday, 21 June 2016

[SOLVED] [BEA-090174] :The trust keystore configuration specified on the command line or in boot.properties does not match the trust keystore configuration specified in config.xml. in Linux

Error : After enabling SSL in OBIEE the SSL enabled URL is not working. In the admin and bi server start up log we got the following error

 "<BEA-090174> <The trust keystore configuration specified on the command line or in boot.properties does not match the trust keystore configuration specified in config.xml.>"


Cause: The keystore that specified in the Admin server is not matching with the one in boot.properties file, In our case admin server is configured to use Custom Identity and Custom Trust file but boot.properties file pointing to Demo certificates. 

Solution: Edit the boot.properties file in Admin and BI server. 

boot.properties file location: /home/oracle/MWHome/user_projects/domains/bifoundation_domain/servers/(select your server)/security/

Remove the tag TrustKeyStore=DemoTrust


Do the change in admin and bi_server after save the file and restart the services.

After restarting you can see Admin server can load the certificates from the mentioned locations as shown below.


Hope this will solve your issue.

Tuesday, 14 June 2016

Linux Commands to stop and start OBIEE11g and Managed servers.

------------Opmnctl stop--------------------------------

$ cd /home/oracle/MWHome/instances/instance1/bin/
$ ./opmnctl stopall


-----------Stop Managed weblogic---------------------

----bi_server1---------
$ cd /home/oracle/MWHome/user_projects/domains/bifoundation_domain/bin/
$ ./stopManagedWebLogic.sh bi_server1 t3://host name:7001 user_name Password

----odi_server1---------
$ ./stopManagedWebLogic.sh odi_server1 t3://host name:7001 user_name Password


------------Stop Admin server-------------------------
$ ./stopWebLogic.sh user_name Password t3://hostname:7001

-----------Stop Node Manager---------------------
$ ps -ef | grep Node | grep nodemanager | grep -v grep | cut -c10-15
$ kill -9 ****


------------Start Node Manager----------------------
$ cd /home/oracle/MWHome/wlserver_10.3/server/bin/
$ nohup ./startNodeManager.sh > Node_manager.out &


------------Start Admin server----------------------
$ cd /home/oracle/MWHome/user_projects/domains/bifoundation_domain/bin/
nohup sh startWebLogic.sh -Dweblogic.management.username=username -Dweblogic.management.password=Password > admin_server.log &

[Start up logs will be written to admin_server.log in the same directory]


to check the log :tail -f admin_server.log

ctrl-z or ctrl-c to exit log window


-----------Start Managed Server-------------

-----bi_server1----------------
$ nohup sh ./startManagedWebLogic.sh bi_server1 t3://localhost:7001 > managed_server_bi.log &

----odi_server1----------------
$ nohup sh ./startManagedWebLogic.sh odi_server1 t3://localhost:7001 > managed_server_odi.log &


---------Start Opmnctl----------------
$ cd /home/oracle/MWHome/instances/instance1/bin/
$ ./opmnctl startall


courtesy:http://hareeobiee.blogspot.in/2013/10/stop-and-start-obiee-11g-linux.html

Wednesday, 1 June 2016

[SOLVED] ODI-17517: Error during task integration in ODI 11g

Error: ODI-17517: Error during task integration in ODI 11g.


Cause: No physical schema is mapped as default for the data server in physical architecture.

Solution : From topology select Physical Architecture and select the data server corresponding to your technology.

There can be multiple physical schema. Select the one that you are working and check the tick box Default.


Monday, 30 May 2016

TNS-12557: TNS:protocol adapter not loadable


Error: While trying to connect to database through command prompt it through the                       error  :TNS-12557: TNS:protocol adapter not loadable


Cause: It is due to the multiple location entries for Oracle clients. So windows can't recognize which adapter to load.

Solution:

Put oracle DB home first in the PATH environment variable.

Then delete the ORACLE_HOME from Environment variable and reboot the PC.


Friday, 27 May 2016

OBIEE 11.1.1.7.0 Installation issue on Oracle Linux 6.7 in Prerequisite Checks step.


ERROR:

We faced an issue while installing OBIEE 11.1.1.7.0 on Oracle Linux 6.7 in Prerequisite Checks step.

"
Check Description:This is a prerequisite condition to test whether the Oracle software is certified on the current O/S or not.
Expected result: One of redhat-6,oracle-6,oracle-5.6,enterprise-5.4,enterprise-4,enterprise-5,redhat-5.4,redhat-4,redhat-5,SuSE-10,SuSE-11
Actual Result: oracle-Oracle
Check complete. The overall result of this check is: Failed <<<<
"


Cause: When you check the error message you can see the OS version is mentioned as oracle-Oracle "Actual Result: oracle-Oracle"

Cause: The installer checks for the version of Linux and doesn't find the version correctly because of that it shows the version as oracle-Oracle. To identify which version is installed you need lbs_release package.

Solution: 

Check which  RedHat packages are installed in your system using below mentioned command.

rpm -q -a 

To install the package execute the command 

yum install redhat-lsb

Then try reinstalling again and this will fix your issue.

Courtesy: https://support.oracle.com/epmos/faces/DocumentDisplay?_afrLoop=552556712835725&id=1487381.1&_afrWindowMode=0&_adf.ctrl-state=8ajtig913_1119 


ODI-10093: You are importing an object from another repository with the same identifier. It is forbidden.

Error:

ODI-10093: You are importing an object from another repository with the same identifier. It is forbidden.

Cause:

Each Work repository has an unique identifier. In this case the work repository that we created and the work repository that we used for import has same identifier.


Solution: 

Change the identifier of the existing work repository.


Steps to change the identifier of work repository.


.
Step 1: Right click on the repository that you want to change the identifier. And select Renumber.


Step 2:

Provide a three digit number for the repository identifier. Then click OK.


Now try importing the repository using smart import.


Hope this will be helpful.


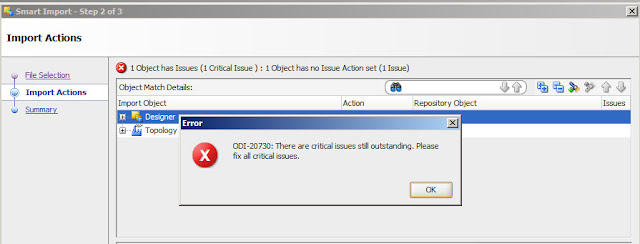
ODI-20730: There are critical issues still outstanding.

Error:

ODI-20730: There are critical issues still outstanding.


Solution:

You can explore the error by clicking the button as shown below in the screen shot.


Now you can see the error details: ODI-10119 A different context is already set as default 

From actions select change so that it will change the default context and you can see red error message changed to green.


As of now you are good to go and proceed with your migration.


Tuesday, 24 May 2016

Oracle Data Integrator 12c 12.2.1 Installation on Windows


ODI 12c Installation.

Software Requirement:

JDK: 1.8 & Above
DB: Oracle 11gR2 latest version or 12c
Download the ODI 12c 12.2.1.0.0Zip From Oracle and unzip this into a single folder.

Installation:


Step 1: Open CMD and navigate to the location where you installed your JDK. We have to run the .jar file using java. Specify the location where you copied your ODI 12C installable as shown in the screen shot.


Step 2: After a few seconds the installer will launch. Click next for the welcome screen.


Step 3: Use this screen to select how you want to receive software updates.


Step 4: In this step you can specify the Oracle_Home directory where you want to install ODI. If you already have an Oracle_Home you can select that location.


Step 5: Select the installation type you want to perform.

(Difference between Standalone Installation and Enterprise Installation
In Enterprise installation we can use the feature ODI Java EE agent. Java EE agent can be deployed as a web application in an application server (WebLogic Server). We use this feature to deploy and manage all application in an application server for example invoking ODI from OBIEE.
If we choose Standalone Installation we are not able to use this Java EE agent.)


Step 6: This step checks whether your system meets the requirements to install ODI 12c. Click next after completing the prerequisite Check.


Step 7:  In this screen you can provide your Oracle support account details if you wish to receive security updates.


Step 8: In this screen you can verify the options that you have provided during installation. If you want to save this into a file, select the option Save Response File and give the location you want to save. Then select the install button.


Step 9: In this step you can see the installation progress. Once it is done click Next button.


Step 10: This is the final step of installation. In this screen you can see the installation summary after verifying click Finish.


Step 11: We can see the installation details from the CMD that we started during the install.


Step 12: From Start select ODI Studio.


Step 13: Then you can see a popup to select JDK location. Select the location of jdk 1.8 and click OK.


Step 14: In this screen it will ask to import preferences from previous ODI installation. If you already have an ODI instance select that and import. Else click no.


Step 15: Finally we have successfully completed the ODI 12c installation and you can see the main window of ODI 12c as shown below.


Friday, 6 May 2016

OBIEE 11g Pointing Connection Pool to another data base in RPD.


Scenario : We need to point data source of OBIEE from one database to another database.

Solution: We can do this through RPD in RPD change the connection pool details and point this to another database

Connection Pool: Connection pool is an object in RPD physical layer that used to define the connection details between BI server and data source.

Double click on the connection pool that you want to edit.


If you are using OCI for connecting to database do the following

Edit the server details in tnsname file located in the below location or add new connection details.

D:\obiee11g\Oracle_BI1\network\admin

Add tns entry for new database and and save the file.

Now take the connection pool and edit the details


For Data source name give the name that you provided in the tns file. Then give the User name and Password for the connection.

After giving Password check the connection by updating row count of tables.


Another method for doing the same is gave the connection description in data source name itself


Friday, 22 April 2016

Exceptions Handling in ODI 11g.

Exceptions Handling in ODI

When we need to send a notification after failure of our load plan ! how we will configure it in ODI.

We can use Exception Handling in ODI 11g.

After setting the load plan we can configure Exception Handling in ODI.

  • Double click on Load Plan then select Exceptions.

  • From the add Button add Exception Step to your load Plan.


  • After this drag your Scenario step created for exception(In this case i created a procedure for failure mail)


  • Now click on your root step in load plan. From Property tab select  Exception Behavior as Run Exception and Raise.


  •  Now you are good to go with the Load Plan. If any error occurred while executing this load plan the exception step will work and you will get the failure mail. 

Thank You.


Thursday, 31 March 2016

Oracle Incremental Update(merge) in ODI 11g.

When we want to run an incremental load in ODI 11g, which is the best IKM that will improve our performance.
  • IKM Oracle Incremental Update (Merge).
IKM Oracle Incremental Update(Merge) uses mainly the following logic for incrementally load the data.

  • First load data to the C$ table from source.
  • Then minus C$ table from target table(In this step updated records and inserted records are selected). 
  • Then load the updated and newly inserted records to I$ table.
  • In the last step it does a merge operation with I$ and Target table.
So go for oracle incremental update(Merge) for optimizing your Incremental update.


Tuesday, 22 March 2016

Timezone Issue while scheduling Scenarios using agent in ODI 11g.


Issue:

I scheduled my scenario to a particular date and time and when i checked it's scheduled time from ODI Agent it's scheduling is stamped for 12:30 hours ahead of the current time.

Cause:

ODI retrieves the start date of a Session with a Java function executed on the machine that is running the Agent/Scenario. This Java function, based on the local Time Zone information, is "System.currentTimeMillis", and this is recorded in the Agent log file.

The datetime shown in Operator however, is computed from the timestamp of the Repository server, not the client/Agent server.

Solution:

As our The ODI client machine and the Repository database machine have in different time zone we have to change the time zone of our agent to the same time zone that our Repository database machine resides.


For that include the -Duser.timezone Java variable in the odiparams.bat/.sh.


odiparams.bat location: D:\MW_HOME\Oracle_ODI\oracledi\agent\bin

Depending on your location add the timezone.

Some Examples:

set ODI_ADDITIONAL_JAVA_OPTIONS="-Duser.timezone=Europe/Paris"
set ODI_ADDITIONAL_JAVA_OPTIONS="-Duser.timezone=GMT+2:00"


I changed the ODI_ADDITIONAL_JAVA_OPTION to "-Duser.timezone= GMT+5:30"

After updating this restart the ODI agent and schedule your Scenario.

It will execute fine.

Courtesy: https://support.oracle.com/epmos/faces/DocumentDisplay?_afrLoop=272099324577098&id=424236.1&displayIndex=2&_afrWindowMode=0&_adf.ctrl-state=rqriev3hs_4#CAUSE


Wednesday, 24 February 2016

Error ORA-00904: "S"."ROW_ID":invalid identifier in ODI 11g


When i tried to populate a dimension using incremental update and  mapped a data base sequence to ROW_ID column in target for surrogate key i got the following error.

ORA-00904: "S"."ROW_ID":invalid identifier


Solution:

When i checked the IKM used for this mapping it is IKM Oracle Incremental Update change this to IKM SQL Incremental Update then the mapping it will work properly.

Tuesday, 23 February 2016

Normalizer Transformation in Informatica


Normalizer Transformation


  • Active and Connected Transformation
  • Normalizer transformation convert  rows that having multiple occurring columns to a single row for each instance of multiple occurring data.

Scenario

We want to convert quarter sales in a shop to a single sales column.

Source 


Expected Output


Mapping using Normalizer Transformation.


Step 1:

Import Source and target to Source analyzer and Target Designer under Designer tab.

Step 2:

  • Drag source and target to mapping designer and import normalizer transformation into the mapping.
  • We can't drag ports directly form source qualifier to normalizer. to add ports we can use Normalizer tab.


  • Add the output ports you need as output for this transformation.
  • As we want to convert 4 Quarter sales to a single sales column output give Occurs of SALES to 4
  • This will create 4 input ports and we can map this Quarter sales to this ports


  • In transformation tab you can change the name of the transformation.


  • Properties tab you can see two options Reset and Restart
  • Reset option is used to reset the key value to the value that is used before the session.
  • Restart option is used to start the generated sequence from 1 and restart for each session.
  • Tracing level represents the amount of information that informatcia server writes in a log file.

Step 3:

  • After creating ports and mapping input ports to the transformation you can map the transformation ports to the target
  • You can see two additional ports are created in transformation 


    • GK: Generated Key - The integration service increments the generated key sequence number each time it process a source row. When the source row contains a multiple-occurring column or a multiple-occurring group of columns, the normalizer transformation returns a row for each occurrence.


    • GCID: Generated Column ID - The GCID is an index for the instance of the multiple-occurring data. For example, if a column occurs 3 times in a source record, the normalizer returns a value of 1,2 or 3 in the generated column ID.
  • Map GCID colum to Quarter in target table

Step 4:

  • Now save your mapping and generate a workflow and run your workflow

Step 5:

  • You can check the status of your workflow in Workflow Monitor 


Thank you.