Monday 30 May 2016

TNS-12557: TNS:protocol adapter not loadable


Error: While trying to connect to database through command prompt it through the                       error  :TNS-12557: TNS:protocol adapter not loadable


Cause: It is due to the multiple location entries for Oracle clients. So windows can't recognize which adapter to load.

Solution:

Put oracle DB home first in the PATH environment variable.

Then delete the ORACLE_HOME from Environment variable and reboot the PC.


Friday 27 May 2016

OBIEE 11.1.1.7.0 Installation issue on Oracle Linux 6.7 in Prerequisite Checks step.


ERROR:

We faced an issue while installing OBIEE 11.1.1.7.0 on Oracle Linux 6.7 in Prerequisite Checks step.

"
Check Description:This is a prerequisite condition to test whether the Oracle software is certified on the current O/S or not.
Expected result: One of redhat-6,oracle-6,oracle-5.6,enterprise-5.4,enterprise-4,enterprise-5,redhat-5.4,redhat-4,redhat-5,SuSE-10,SuSE-11
Actual Result: oracle-Oracle
Check complete. The overall result of this check is: Failed <<<<
"


Cause: When you check the error message you can see the OS version is mentioned as oracle-Oracle "Actual Result: oracle-Oracle"

Cause: The installer checks for the version of Linux and doesn't find the version correctly because of that it shows the version as oracle-Oracle. To identify which version is installed you need lbs_release package.

Solution: 

Check which  RedHat packages are installed in your system using below mentioned command.

rpm -q -a 

To install the package execute the command 

yum install redhat-lsb

Then try reinstalling again and this will fix your issue.

Courtesy: https://support.oracle.com/epmos/faces/DocumentDisplay?_afrLoop=552556712835725&id=1487381.1&_afrWindowMode=0&_adf.ctrl-state=8ajtig913_1119 


ODI-10093: You are importing an object from another repository with the same identifier. It is forbidden.

Error:

ODI-10093: You are importing an object from another repository with the same identifier. It is forbidden.

Cause:

Each Work repository has an unique identifier. In this case the work repository that we created and the work repository that we used for import has same identifier.


Solution: 

Change the identifier of the existing work repository.


Steps to change the identifier of work repository.


.
Step 1: Right click on the repository that you want to change the identifier. And select Renumber.


Step 2:

Provide a three digit number for the repository identifier. Then click OK.


Now try importing the repository using smart import.


Hope this will be helpful.


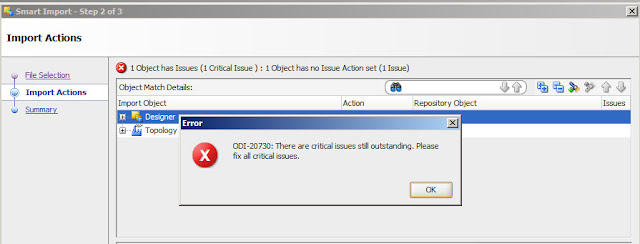
ODI-20730: There are critical issues still outstanding.

Error:

ODI-20730: There are critical issues still outstanding.


Solution:

You can explore the error by clicking the button as shown below in the screen shot.


Now you can see the error details: ODI-10119 A different context is already set as default 

From actions select change so that it will change the default context and you can see red error message changed to green.


As of now you are good to go and proceed with your migration.


Tuesday 24 May 2016

Oracle Data Integrator 12c 12.2.1 Installation on Windows


ODI 12c Installation.

Software Requirement:

JDK: 1.8 & Above
DB: Oracle 11gR2 latest version or 12c
Download the ODI 12c 12.2.1.0.0Zip From Oracle and unzip this into a single folder.

Installation:


Step 1: Open CMD and navigate to the location where you installed your JDK. We have to run the .jar file using java. Specify the location where you copied your ODI 12C installable as shown in the screen shot.


Step 2: After a few seconds the installer will launch. Click next for the welcome screen.


Step 3: Use this screen to select how you want to receive software updates.


Step 4: In this step you can specify the Oracle_Home directory where you want to install ODI. If you already have an Oracle_Home you can select that location.


Step 5: Select the installation type you want to perform.

(Difference between Standalone Installation and Enterprise Installation
In Enterprise installation we can use the feature ODI Java EE agent. Java EE agent can be deployed as a web application in an application server (WebLogic Server). We use this feature to deploy and manage all application in an application server for example invoking ODI from OBIEE.
If we choose Standalone Installation we are not able to use this Java EE agent.)


Step 6: This step checks whether your system meets the requirements to install ODI 12c. Click next after completing the prerequisite Check.


Step 7:  In this screen you can provide your Oracle support account details if you wish to receive security updates.


Step 8: In this screen you can verify the options that you have provided during installation. If you want to save this into a file, select the option Save Response File and give the location you want to save. Then select the install button.


Step 9: In this step you can see the installation progress. Once it is done click Next button.


Step 10: This is the final step of installation. In this screen you can see the installation summary after verifying click Finish.


Step 11: We can see the installation details from the CMD that we started during the install.


Step 12: From Start select ODI Studio.


Step 13: Then you can see a popup to select JDK location. Select the location of jdk 1.8 and click OK.


Step 14: In this screen it will ask to import preferences from previous ODI installation. If you already have an ODI instance select that and import. Else click no.


Step 15: Finally we have successfully completed the ODI 12c installation and you can see the main window of ODI 12c as shown below.


Friday 6 May 2016

OBIEE 11g Pointing Connection Pool to another data base in RPD.


Scenario : We need to point data source of OBIEE from one database to another database.

Solution: We can do this through RPD in RPD change the connection pool details and point this to another database

Connection Pool: Connection pool is an object in RPD physical layer that used to define the connection details between BI server and data source.

Double click on the connection pool that you want to edit.


If you are using OCI for connecting to database do the following

Edit the server details in tnsname file located in the below location or add new connection details.

D:\obiee11g\Oracle_BI1\network\admin

Add tns entry for new database and and save the file.

Now take the connection pool and edit the details


For Data source name give the name that you provided in the tns file. Then give the User name and Password for the connection.

After giving Password check the connection by updating row count of tables.


Another method for doing the same is gave the connection description in data source name itself