Steps to Convert a PFX Certificate into a JKS Certificate
to configure it on OBIEE
Step 1:
Set up the environment for
the domain, by executing the setDomainEnv.cmd script, typically located atC:\MW_HOME\user_projects\domains\bifoundation_domain\binsetDomainEnv.cmd
Step 2:
Use OpenSSL to check the pfx certificate's
content.[Note: OpenSSL is open source software to
implement basic cryptographic functions and provides various utility functions]
At this point, a password for the pfx file will be requested.
Expected output:openssl pkcs12 -in <certificate.pfx>
-out KEYSTORE.pem -nodes
Enter Import Password:
MAC verified OK
Step 3:
Open KEYSTORE.pem file, from step 2. This should look
similar to this: You will find three certificates on it and the private key:
Bag Attributes
Microsoft Local Key set: <No Values>
localKeyID: 01 00 00 00
friendlyName: le-36c42c6e-ec49-413c-891e-591f7e3dd306
Microsoft CSP Name: Microsoft RSA SChannel Cryptographic Provider
Key Attributes
X509v3 Key Usage: 10
-----BEGIN RSA PRIVATE KEY-----
MIIEpQIBAAKCAQEAtPwoO3eOwSyOapzZgcDnQOH27cOaaejHtNh921Pd+U4N+dlm
.
.
.
EDITING
.
.
.
R5rsB00Yk1/2W9UqD9Nn7cDuMdilS8g9CUqnnSlDkSG0AX67auKUAcI=
-----END RSA PRIVATE KEY-----
Bag Attributes
localKeyID: 01 00 00 00
friendlyName: *.something.com
subject=/serialNumber=sj6QjpTjKcpQGZ9QqWO-pFvsakS1t8MV/C=US/ST=Missouri/L=CHESTERFIELD/O=Oracle_Corp,
Inc./OU=Oracle/CN=*.something.com
issuer=/C=US/O=GeoTrust, Inc./CN=GeoTrust SSL CA
-----BEGIN CERTIFICATE-----
MIIErzCCA5egAwIBAgIDAIH6MA0GCSqGSIb3DQEBBQUAMEAxCzAJBgNVBAYTAlVT
.
.
.
EDITING
.
.
.
wA5JxaU55teoWkuiAaYRQpuLepJfzw+qMk5i5FpMRbVMMfkcBusGtdW5OrAoYDL9
4rgR
-----END CERTIFICATE-----
Bag Attributes
friendlyName: GeoTrust Global CA
subject=/C=US/O=GeoTrust Inc. /CN=GeoTrust Global CA
issuer=/C=US/O=GeoTrust Inc. /CN=GeoTrust Global CA
-----BEGIN CERTIFICATE-----
MIIDVDCCAjygAwIBAgIDAjRWMA0GCSqGSIb3DQEBBQUAMEIxCzAJBgNVBAYTAlVT
.
.
.
EDITING
.
.
.
5fEWCRE11azbJHFwLJhWC9kXtNHjUStedejV0NxPNO3CBWaAocvmMw==
-----END CERTIFICATE-----
Bag Attributes: <Empty Attributes>
subject=/C=US/O=GeoTrust, Inc. /CN=GeoTrust SSL CA
issuer=/C=US/O=GeoTrust Inc. /CN=GeoTrust Global CA
-----BEGIN CERTIFICATE-----
MIID2TCCAsGgAwIBAgIDAjbQMA0GCSqGSIb3DQEBBQUAMEIxCzAJBgNVBAYTAlVT
.
.
.
EDITING
.
.
.
TpnKXKBuervdo5AaRTPvvz7SBMS24CqFZUE+ENQ=
-----END CERTIFICATE-----
Step4:
Identify and store contents from KEYSTORE.pem
certificate, to proceed and create jks files:
At this point, you will find three
certificates on KEYSTORE.pem and the
private key. 4.1 Private Key.
To identify the private key, look for the following headings:-----BEGIN RSA PRIVATE KEY-----
-----END RSA PRIVATE KEY-----
Both above mentioned tags will be surrounded the private key. Go ahead and save
the content of it into a file called: my_key_pk.pem. This has to
include the headings.
Expected file:-----BEGIN RSA PRIVATE KEY-----
MIIEpQIBAAKCAQEAtPwoO3eOwSyOapzZgcDnQOH27cOaaejHtNh921Pd+U4N+dlm
.
.
.
EDIT
.
.
.
Y4ZrW12PRa9/EOBGTG5teKAEada/K4yKReTyQQAGq6j5RjErmuuKkKgPGMSCjvMS
R5rsB00Yk1/2W9UqD9Nn7cDuMdilS8g9CUqnnSlDkSG0AX67auKUAcI=
-----END RSA PRIVATE KEY-----
4.2 Root Certificate.
To identify the Root Certificate, look for the following headings:subject=/C=US/O=GeoTrust Inc./CN=GeoTrust
Global CA
issuer=/C=US/O=GeoTrust Inc./CN=GeoTrust Global CA
Subject and issuer must be the same. Go ahead and save the content of it into a
file called: my_key_root.pem. Include all the content from
BEGIN CERTIFICATE TO END CERTIFICATE, both included.
4.3 Intermediate Certificate.
To identify an Intermediate Certificate, look for the following heading:subject=/C=US/O=GeoTrust, Inc./CN=GeoTrust
SSL CA
issuer=/C=US/O=GeoTrust Inc./CN=GeoTrust Global CA
Subject and issuer are different only on the CN. Go ahead and save the
content of it into a file
called:my_key_intermediate.pem. Include
all the content from BEGIN CERTIFICATE TO END CERTIFICATE, both included.
NOTE: This certificate is optional and there are some
cases where it'll not be present. If this is the case, go ahead and skip this
step. In any other case, this needs to be added to the identity keystore jks
file.
To identify a Server Certificate, look for the following heading:
friendlyName: some.thing.com
subject=/serialNumber=sj6QjpTjKcpQGZ9QqWO-pFvsakS1t8MV/C=US/ST=Missouri/L=CHESTERFIELD/O=Oracle_Corp,
Inc./OU=Oracle/CN=some.thing.com
A server certificate includes a
heading called Friendly Name. Go ahead and save the content of it into a file
called: my_key_crt.pem. Include all the content from BEGIN
CERTIFICATE TO END CERTIFICATE, both included.
Step
5:
keytool -import -trustcacerts -file
my_key_root.pem -alias my_key_root -keystore my_key_trust.jks -storepass
<store_pass> -keypass <key_pass>
Expected Output:
Certificate already exists in system-wide CA
keystore under alias <geotrustglobalca>
Do you still want to add it to your own keystore? [no]: yes
Certificate was added to keystore Step 6: Generate an Identity Keystore and import
Server into it. Java utils.ImportPrivateKey -keystore
my_key_identity.jks -storepass <store_pass> -storetype JKS -keypass
<key_pass> -alias server_identity -certfile my_key_crt.pem -keyfile
my_key_pk.pem -keyfilepass <pfx_password>
With these instructions, two jks files will be produced:
·
my_key_identity.jks
Steps to configure Custom Identity and Custom Trust with Weblogic

Step 1: Login to Weblogic Admin console
Step 2: Click on Lock & Edit
Step 3:
Environment
--> Servers --> < server_name_where_ssl_has_to_be_configured >
Step 4: Select
Admin Server
Step 5:
Step 6:
Step 7:
Step 8:
Step 9:
Step 10:
Repeat the
same steps for bi_server1 set the ssl listen port as 9804(make sure the port is
available)
Step 11: Click on
Activate changes
Step
12:
Configure
node manager for SSL
3. Add the
following properties to this file:
Step 13: Save the
file and restart all services
Step 14:
Specify
the file you want to import
·
Type
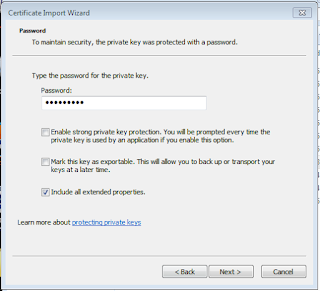
your pfx Password
Select certificate store as Trusted Root Certification Authorities
·
Click Flinish

Environment --> Servers --> < server_name_where_ssl_has_to_be_configured >
Repeat the same steps for bi_server1 set the ssl listen port as 9804(make sure the port is available)
Configure node manager for SSL


No comments:
Post a Comment